How to Do a Reverse Image Search: Find Any Image's Original Source
2026-08-27 · 7 min read
Every image you see online came from somewhere—a photographer's portfolio, a stock library, a newsroom, or someone else's blog post. Reverse image search is the fastest way to trace that path backward. Instead of typing words into a search box, you feed the search engine an image, and it shows you where that image appears across the web.
For creators, this one skill solves three recurring problems:
- Finding sources. You have a copy of a photo and need to credit the photographer, ask for permission, or buy the correct license.
- Checking infringement. You suspect your own work is being used without permission and want to see where it has spread.
- Verifying authorization. A client or colleague hands you an image "from Google," and you need to know whether using it is actually safe.
The best part is that reverse image search is free, fast, and requires no special software. This guide walks through the three tools that matter most—Google Images, Bing Visual Search, and TinEye—with step-by-step instructions for each. If you're new to the underlying rules, our guide to image copyright basics explains how protection works automatically under U.S. law, and this overview of what happens when a copyrighted image is used without permission shows why checking before you publish matters.
Google Images
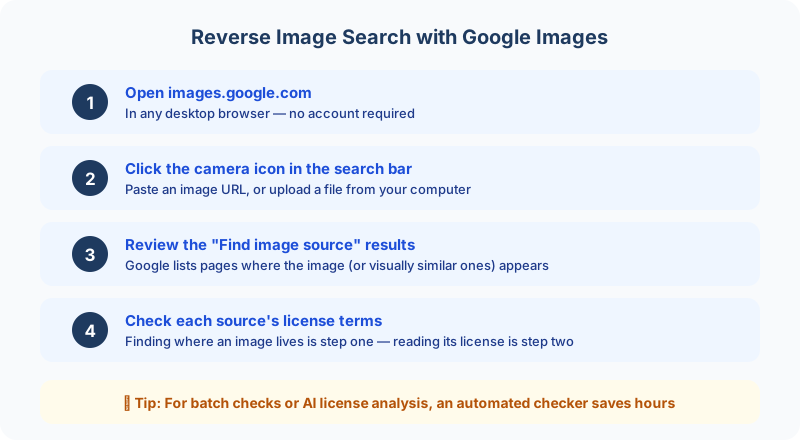
Google Images is the best starting point for most searches: its index is the largest on the web, and its results are powered in part by Google Lens, which analyzes an image's visual features—shapes, objects, colors, and textures—rather than just raw pixels. That means Lens often finds matches even when an image has been cropped, filtered, or otherwise modified. Here is how to run a reverse image search in four steps.
Step 1: Open Google Images
Go to Google Images in any desktop browser.
Step 2: Click the camera icon
In the search bar, click the camera icon labeled "Search by image." A panel will open with options to upload a file or paste a URL.
Step 3: Upload your image or paste its URL
- Upload. Drag and drop an image from your computer, or click "Upload a file" and browse to it.
- Paste a URL. If the image lives online, right-click it and choose "Copy image address," then paste that URL into the field.
Step 4: Review the "Find image source" results
After you submit, Google shows a results page organized around your image. The most useful section is "Find image source," which lists pages that contain the image or close matches—often including the photographer's site, a stock platform, or the original article. Below it, Google displays a thumbnail of your image with links to available sizes, followed by "Visually similar images" and related searches.
If the first search is inconclusive, run it again with a cropped version of the image. Different crops can surface different results, and a tighter crop sometimes leads straight to the original.
On mobile
On a phone, Google Images tends to route you into the Lens app experience, which works well but skips the classic results page. To get the standard camera-icon workflow on mobile, open Chrome, tap the three-dot menu, and enable "Desktop site." The desktop interface—including the camera icon—then works exactly as described above. On Android, you can also long-press most images and choose "Search image with Google Lens" for a quick check without switching apps.
Bing Visual Search
Bing runs a separate index from Google, so its visual search sometimes finds matches Google misses. That makes it a valuable second opinion.
To use Bing Visual Search:
- Go to Bing and click the Images tab, which opens Bing Image Search.
- Click the camera icon in the search box labeled "Search using an image."
- Upload an image from your device, paste an image URL, or take a photo with your webcam.
- Review the results. Bing groups matches into "Pages with this image" and "Visually similar images," and it often adds context such as text that appeared near the image or related product listings.
That last feature is especially handy for product photos: if you're trying to identify an object in a picture, Bing frequently surfaces the shopping page it came from.
TinEye
TinEye takes a different approach. Instead of searching for visually similar images, it generates a fingerprint of the image you submit and looks for pixel-level matches in its own index of billions of images. This makes TinEye the sharpest tool for one specific job: finding exact matches of the same image, even after it has been resized, recompressed, or lightly edited.
The difference from Google matters in practice:
- Google Images is built for discovery. It returns similar images—other photos of the same subject, different frames from the same shoot, lookalikes. Great for identifying what something is or exploring alternatives.
- TinEye is built for verification. It returns the same image wherever it appears. Great for answering "Where did this exact picture come from, and where else has it been used?"
For finding the original source, sort TinEye's results by oldest to see the earliest appearance of the image, which often points to the creator's own site or the first publication. If you're tracking your own photography across the web, TinEye's exact-match results make it easy to spot unauthorized copies.
TinEye's trade-offs are its smaller index and daily limits on free searches, so treat it as a precision tool rather than a general-purpose one.
When Reverse Search Is Not Enough
As powerful as these tools are, they have blind spots worth knowing about:
- Heavily modified images. Aggressive cropping, flipping, text overlays, or composite edits can defeat pixel-based matching. Google Lens is the most resilient here, but even it has limits.
- Unindexed pages. Images that live only on private profiles, group chats, intranets, or paywalled archives never enter a search index, so no search engine will find them.
- Very new images. An image uploaded minutes ago may not be indexed yet; results can take time to appear.
There is also a more fundamental limit: reverse image search tells you where an image appears, not whether you may use it. Finding a photo on a blog does not mean the blog owns it or that you have permission to reuse it. Ownership, licensing, and the possibility of fair use under U.S. law are separate questions. Once a search leads you to a source, you still need to check the license type and contact the rightsholder—our step-by-step guide to checking image copyright walks through that process.
That's where automated analysis earns its place. Tools like ImageCopyrightChecker combine reverse search with a rule-based verdict: upload an image and receive source matches, a clear conclusion about what you can do with it, and the evidence behind it in a single report, instead of running several manual searches and still guessing. If you'd rather sidestep the question altogether, our list of free image sources covers platforms where every image comes with a clear license.
This guide is informational and does not constitute legal advice. For high-stakes commercial uses, consult a qualified attorney.
Check Images Before You Publish
Reverse image search is a first step, not a final answer. Before you publish any image you didn't create yourself, give it a proper check. Upload your images to our image copyright checker and get a verdict on copyright risks, with the source matches behind it, in seconds. New users get 3 free checks on sign in.